
작년에 나온 Sign in with Apple..
2020년 4월에는 소셜 로그인 기반 앱들은 강제로 애플 로그인도 같이 도입을 해야 한다기에..... 양아ㅊ..
하이튼 애플 로그인을 서버와 같이 개발을 하게 되었다.
근데 이게 거의 인앱 결제처럼 앱에서 할 일은 거의 없었다.
서버가 이래저래 고생을 했지만.... 서버 알아서 잘하셨음..
https://developer.apple.com/account/resources/authkeys/list

이 화면에서 개발용 key를 만듭시다.

이미 개발용이 있다면 Sign in with Apple을 체크해줍시다.
그리고 configure를 클릭해서 primary App ID를 개발용 타깃으로 했다면 선택을 해주시고..
혹시 타깃이 아니라면 개발용을 따로 만들지 말고 이미 APNS로
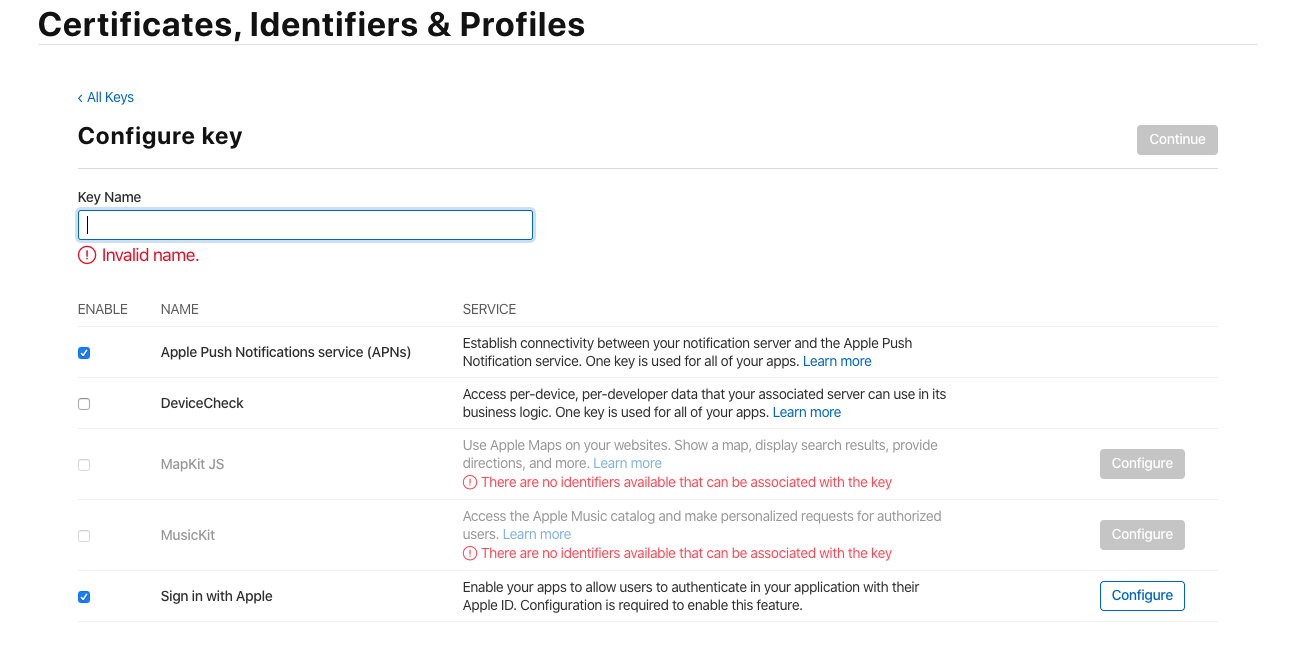
이미 release용으로 apns key를 만들어 놨기 때문에 그것에 Sign in with Apple을 체크하고 configure를 클릭해서 app id를 설정해 줍니다.
key를 apns로 이미 발급을 받으셨다면 다시 삭제 안 하고 그냥 저렇게 설정만 해주면 sign in with apple도 지원이 되니 굳이 지웠다가 다시 새로 발급 안 받아도 된다.
일단 저 페이지에서는 저 설정만 해주면 끝!! 1
그다음은 서버가 알아서..
이제 xcode 상에서 어떻게 개발을 했는지 봅시다.

파란 거 꼭 추가하셔야 합니다!!
//이거 해줘야 함
import AuthenticationServices


class ViewController: UIViewController {
    // appleLogin 버튼의 containerView
    @IBOutlet weak var appleLoginContainerView : UIView!

    // IBOulet으로 연결된 container view 에 apple login 버튼 생성 후 자리 배치
    func setUpProviderLoginView() {
        // iOS 13부터 지원이라 분기..
        // iOS 13이 아닌 경우는 사실 container View를 지워주거나 height를 0으로 만들어서 없애줘야 하지만..귀찮아서..
        if #available(iOS 13.0, *) {
            let button = ASAuthorizationAppleIDButton(type: .signIn, style: .whiteOutline)
            button.translatesAutoresizingMaskIntoConstraints = false
            self.appleLoginContainerView.addSubview(button)

            button.addTarget(self, action: #selector(appleLoginAction(_:)), for: .touchUpInside)
            button.cornerRadius = 30 // 최대값이 넘어가면 알아서 max로 해줌

            button.translatesAutoresizingMaskIntoConstraints = false
            button.leadingAnchor.constraint(equalTo: appleLoginContainerView.leadingAnchor, constant: 0).isActive = true
            button.trailingAnchor.constraint(equalTo: appleLoginContainerView.trailingAnchor, constant: 0).isActive = true
            button.topAnchor.constraint(equalTo: appleLoginContainerView.topAnchor, constant: 0).isActive = true
            button.bottomAnchor.constraint(equalTo: appleLoginContainerView.bottomAnchor, constant: 0).isActive = true

        } else {
            // Fallback on earlier versions
        }
    }

    // appleLoing 버튼 클릭시 실행
    // iOS13 부터 지원이라 혹시라도 클릭이 된다면 예외처리
    func appleLoginAction(_ sender : UIButton) {
        if #available(iOS 13.0, *) {
            self.appleLogin()
        } else {
            self.present(showAlertViewController(message: "현재 iOS 버전에서는 Apple Id를 통한 로그인이 불가능합니다.", actionTitle: I18N.confirm), animated: true, completion: nil)
        }
    }
}
위에는 애플 로그인 버튼 생성 및 기능 설정까지 이다.
//MARK: AppleLoginDelegate - ASAuthorizationControllerDelegate

extension ViewController : ASAuthorizationControllerPresentationContextProviding, ASAuthorizationControllerDelegate {

    @available(iOS 13.0, *)
    func appleLogin() {
        let request = ASAuthorizationAppleIDProvider().createRequest()
        request.requestedScopes = [.fullName, .email]
        let controller = ASAuthorizationController(authorizationRequests: [request])
        controller.delegate = self
        controller.presentationContextProvider = self
        controller.performRequests()
    }


    @available(iOS 13.0, *)
    func presentationAnchor(for controller: ASAuthorizationController) -> ASPresentationAnchor {
        return self.view.window!
    }


    @available(iOS 13.0, *)
    func authorizationController(controller: ASAuthorizationController, didCompleteWithAuthorization authorization: ASAuthorization) {

        if let appleIDCredential = authorization.credential as? ASAuthorizationAppleIDCredential {
            let authorizationCode = String(data: appleIDCredential.authorizationCode!, encoding: .utf8)

            do {

            } catch {
                print("Unable to save userIdentifier to keychain.")
            }

            //애플 로그인 완료 되었을 때 우리는
            var params = [String:Any]()

            params["authorizationCode"] = authorizationCode

			// 여기서 자신의 회사의 서버와 통신..
            // authorizationCode 이 코드만 넘겨 주었더니 알아서 인증 해주시고 완료 되었다.
            // 이거 말고 email, identityToken , user 등 데이터를 받을 수 있음..
            // 하지만 서버에서도 애플을 통해서 여러 정보를 받아 올 수 있으니
            // 우리는 서버에게 "authorizationCode" 이 코드만 넘겨 주면 됨

        } else if let passwordCredential = authorization.credential as? ASPasswordCredential {
            // Sign in using an existing iCloud Keychain credential.
            let username = passwordCredential.user
            let password = passwordCredential.password

            // For the purpose of this demo app, show the password credential as an alert.
            DispatchQueue.main.async {
                let message = "The app has received your selected credential from the keychain. \n\n Username: \(username)\n Password: \(password)"
                let alertController = UIAlertController(title: "Keychain Credential Received",
                                                        message: message,
                                                        preferredStyle: .alert)
                alertController.addAction(UIAlertAction(title: "Dismiss", style: .cancel, handler: nil))
                self.present(alertController, animated: true, completion: nil)
            }
        }
    }

    @available(iOS 13.0, *)
    func authorizationController(controller: ASAuthorizationController, didCompleteWithError error: Error) {
        print(error)
    }
}
이 부분은 애플 로그인 예제에서 delegate 부분을 갖고 왔다.
우리는 다른 부분은 기본에 맡기고
func authorizationController(controller: ASAuthorizationController, didCompleteWithAuthorization authorization: ASAuthorization)
이 함수에서 작성한 주석과 같은 행복만 하면 된다.
애플의 결제나 기타 기능과 같이 사실 클라이언트는 iOS 버전에 맞게 애플 로그인 버튼을 보여줄 건지 말 건지 예외 처리를 해주고.
애플 로그인 버튼의 이벤트를 코드와 같이 지정을 해주면..
애플이 알아서 다 해준다.
애플 아이디가 이미 있을 때.. 없을 때... 뭔가 잘못되었을 때도 우리는 어떤 에러가 있는지는
func authorizationController(controller: ASAuthorizationController, didCompleteWithError error: Error)
의 delegate 함수를 통해서 알 수 있으며..
성공 시 서버에
appleIDCredential 이 코드를 넘겨주면 된다.
그리고 서버가 로그인을 승인해 줬으면 다음 단계로 넘기면 되고 잘못된 정보라면 그에 대한 에러 처리를 해주면 된다.
애플 로그인도 귀찮지만 상당히 개발자 편하게 쉽게 개발을 할 수 있게 해 주었다.
끝!
'개발 블로그 > 아이폰개발' 카테고리의 다른 글
| [iOS Swift] Xcode Server를 이용한 CI(Continuous Integration) 설정하기 1편 (0) | 2020.07.30 |
|---|---|
| [iOS SWIFT] WKWebview에서 WKUserContentContoller 를 JavaScript 연동 (Native <-> JavaScript) 통신 (0) | 2020.06.30 |
| [iOS Swift] Swift Style Guide , 스위프트 코딩 스타일 가이드 (coding standard] (0) | 2020.06.10 |
| [iOS 유용한 메소드] joined() 배열을 텍스트로 나눌때 편한 함수 "," , "-" (0) | 2020.05.29 |
| [iOS Swift 디자인패턴] 싱글톤 패턴(Singleton 패턴)에 대해서 알아보자..왜 사용하지? (0) | 2020.05.19 |
| [iOS 딥링크(DeepLink)] 딥링크 실제 구현 Flow (0) | 2020.02.03 |
| [iOS GCD(Grand Central Dispatch)] 기본 2 단계 (0) | 2020.01.09 |
| [iOS GCD(Grand Central Dispatch)] 기본 1 단계 (0) | 2019.12.30 |
| [iOS GCD(Grand Central Dispatch)] 소개 및 멀티스레드 프로그래밍 (0) | 2019.12.19 |
| [iOS 앱 내 구입] iOS 앱 내 결제 시스템 구현편 (0) | 2019.12.13 |


댓글